


Additionally, to the video series, I’ve put together a short breakdown of some of the images I created during the BETA testing of ZBrush 2021. The process to produce the images below is just an extension of what I explain in the video series.
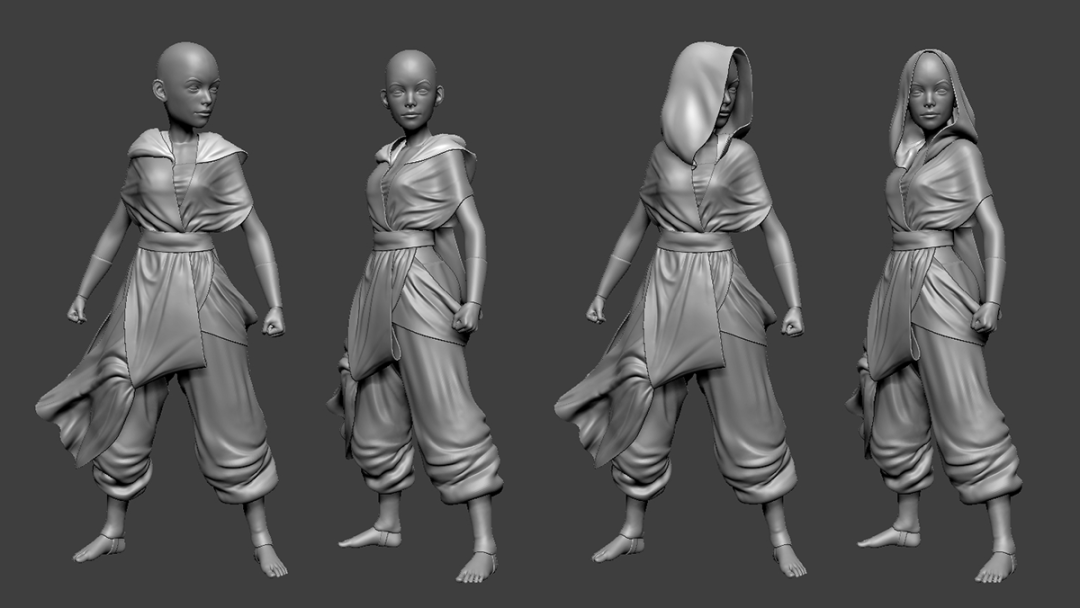
For instance, the ‘blind monk’ character, is 100% ZBrush using the same techniques I explain on the video series. The complexity of the model is simply given by the various subtools that make the outfit.

Below is a reference showing how I approached the modeling process and layers of cloth using ‘stretched’ 3D planes and Dynamesh objects with Dynamics. If you want to recreate a specific type of clothing, the trick is in knowing how to split it into various parts. Multiple subtools will give you a lot more control and keep the simulation light.
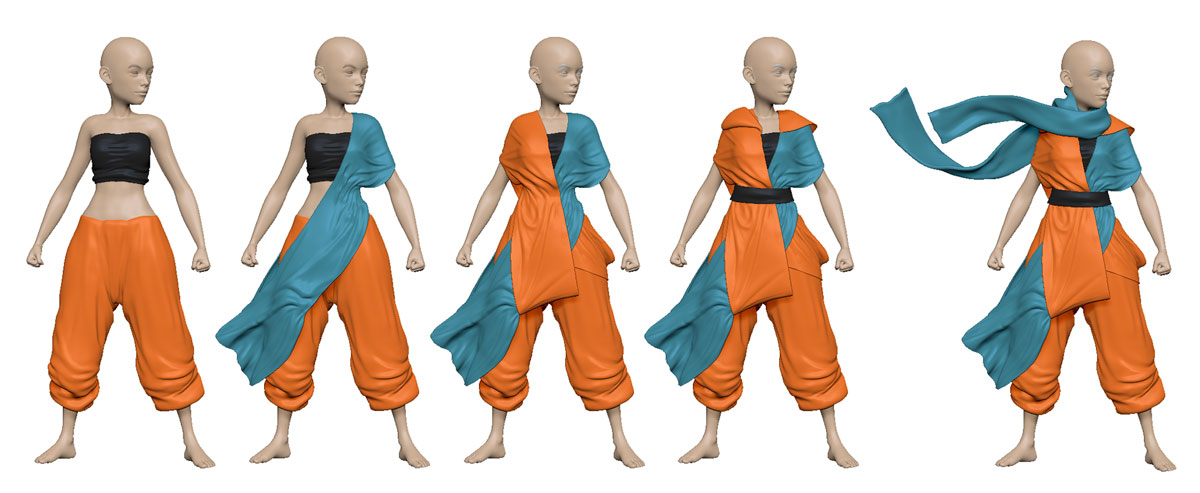
Most of the pieces in this character were created using the new TransposeCloth to set the position and then a combination of masking with Dynamics. The key is to balance out the settings from the Dynamics palette (as I mentioned in the video series) and adjust the result using either brushes with Dynamics (cloth brushes) and/or tools that you are familiar with.
Masking is super important to control the areas you want to apply certan effects of the dynamics. For instance, you might want to mask an area around the shoulders and let Gravity do the rest, or mask a section in the midde of the body and run the ‘Contract’ function to wrap a specific area to the body.
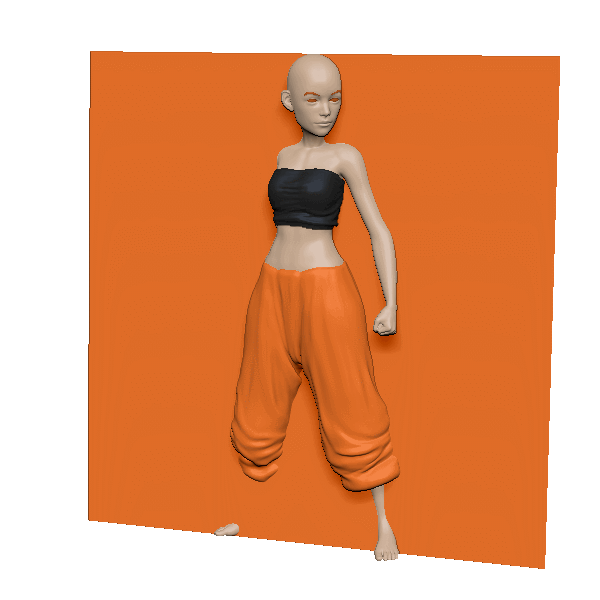
For the pants, I used the same base mesh of the body. Using masking, I extracted a single-sided mesh around the legs and hips and then ran a ZRemesher process to simplify the geometry. After the ZRemesher I use the ‘Contract’ function to make the newly extracted mesh conform to the body a bit better. (not a huge difference since it was coming from the same mesh).
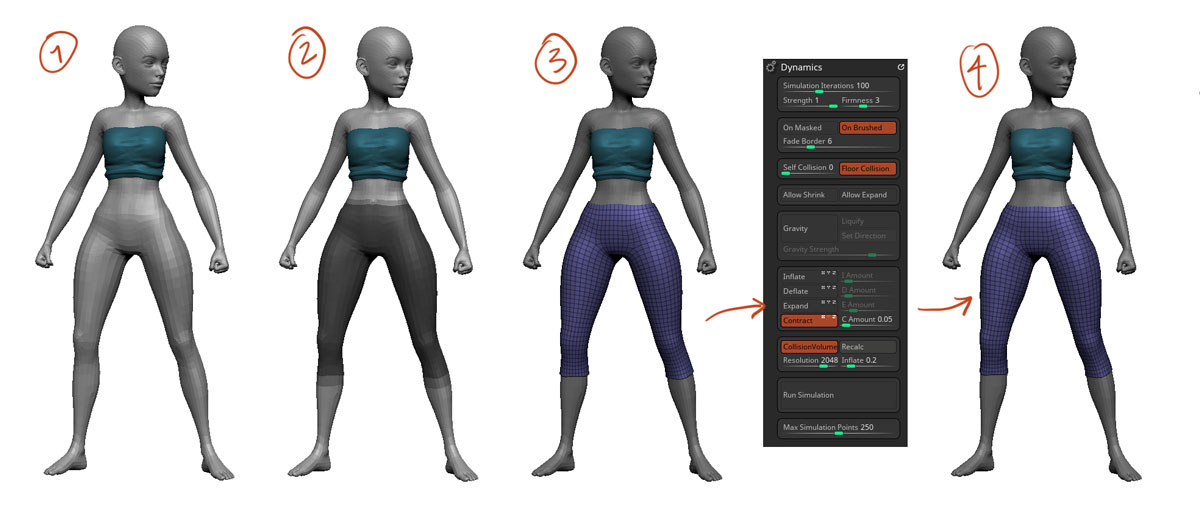
with the new mesh for the pants ready, I created playgroups for the top and bottom so that it will be easy to select and mask. With the borders of the pants masked (to protect them from the simulation), I used the ‘Inflate’ feature from the Dynamics palette to ‘pump air’ into the pants.
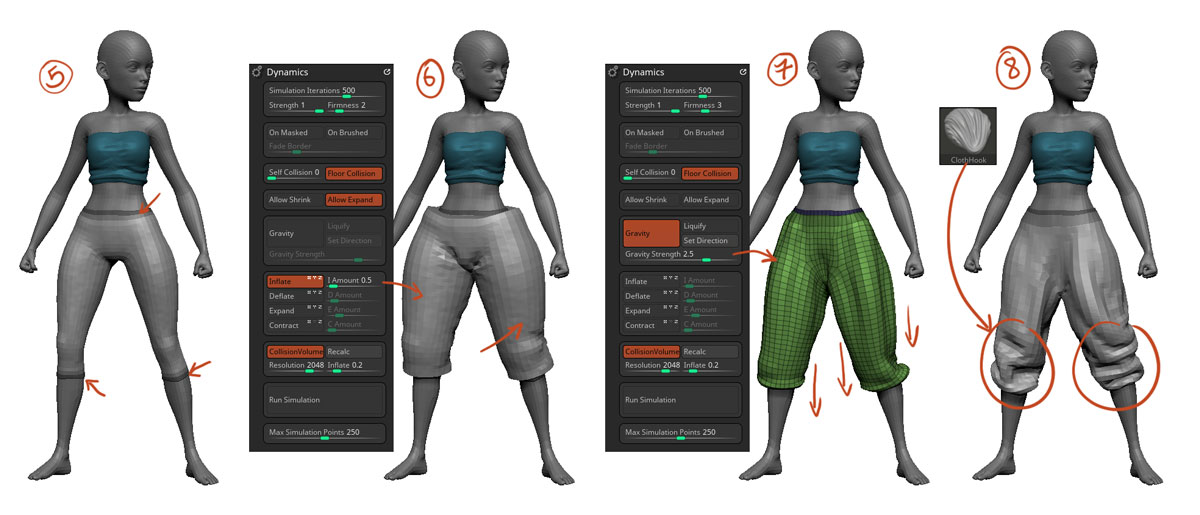
I then switched to another set of settings for the simulation with a bit more ‘Firmness’ to keep the form better, Gravity to pull things towards the ground and not ‘Inflate’… This gives the effect of the ‘baggy pants’ I was going for.
Finally, I used the ‘ClothHook’ with the ‘On Brushed’ switch enabled, to fine-tune the compression areas of the pants
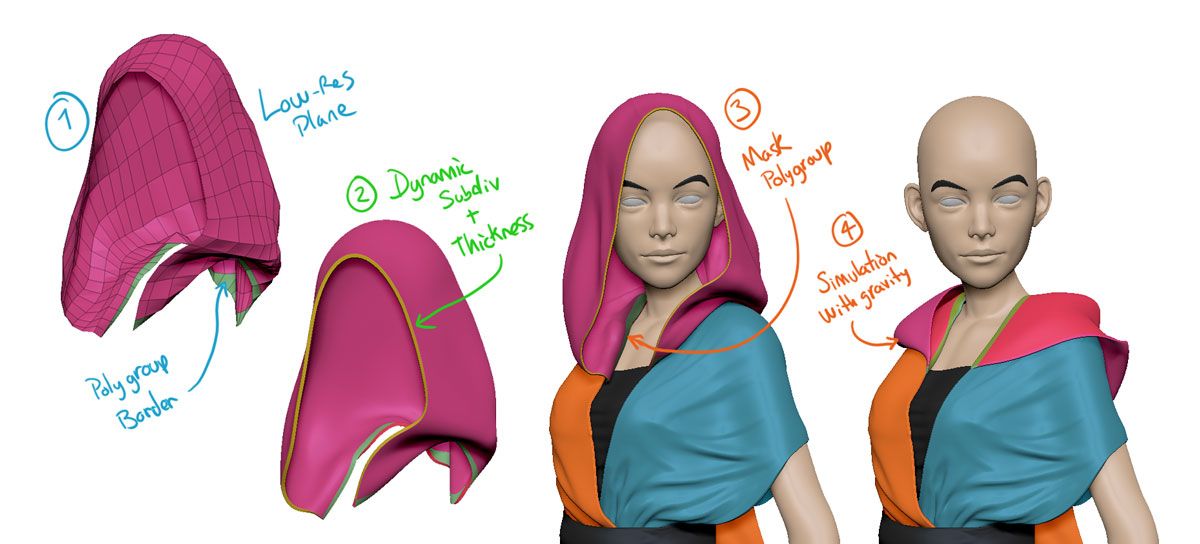
Another great thing about Dynamics is that in certain cases, it allows you to test different options very quickly. For this character, I created a simple piece for the hoodie of the outfit and use dynamics to adjust the shape. However, I later decided that the hoodie was covering too much of the face, so with dynamics and a bit of ‘pulling’ using the ClothHook brush, I changed the hoodie in just a couple of steps.
Like I did with the pants, the key is in masking borders or certain areas to control where you want to run the simulation. In the case of the ‘hoodie’, I already had tweaked the connection with the rest of the outfit, so I created a playgroup and masked that area and ran the simulation on the rest.
The use of Dynamics doesn’t have to be on perfectly aligned flat garments or clean meshes… you can actually run a simulation on anything like a Dynamesh object, and go back and forth between simulation and dynamesh.
Here is a short time-lapse of a quick sketching session I did while testing some of the features in the Dynamics palette:
The first thing that comes to mind when thinking about Dynamics, might be to produce clothing. However, there is so much more that can be done with Dynamics, especially if you keep in mind that this is just a new addition to an already pretty impressive set of tools in ZBrush!
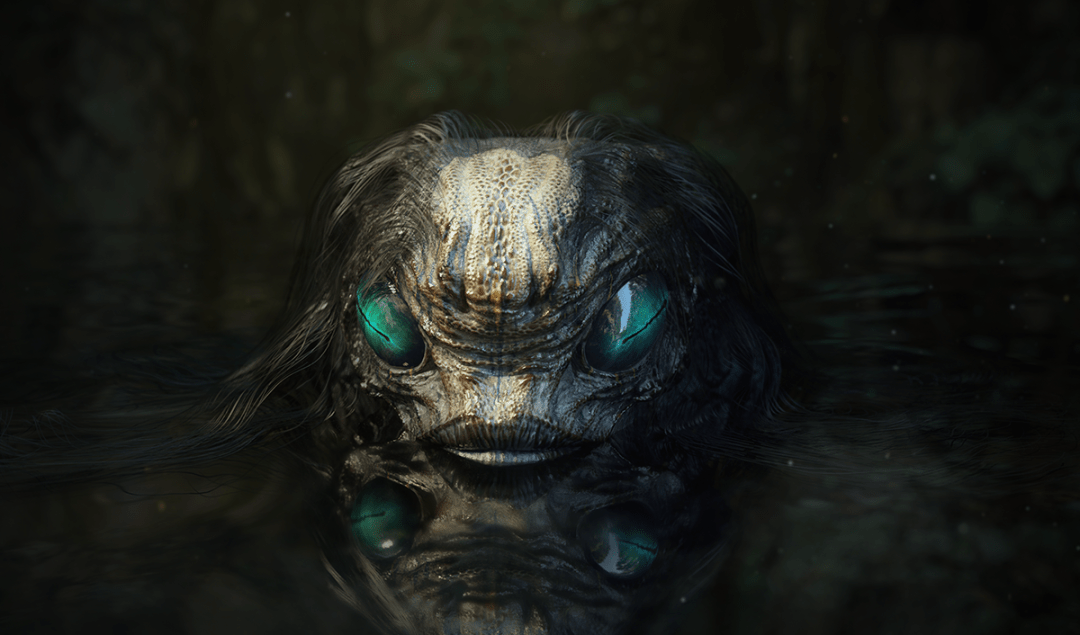
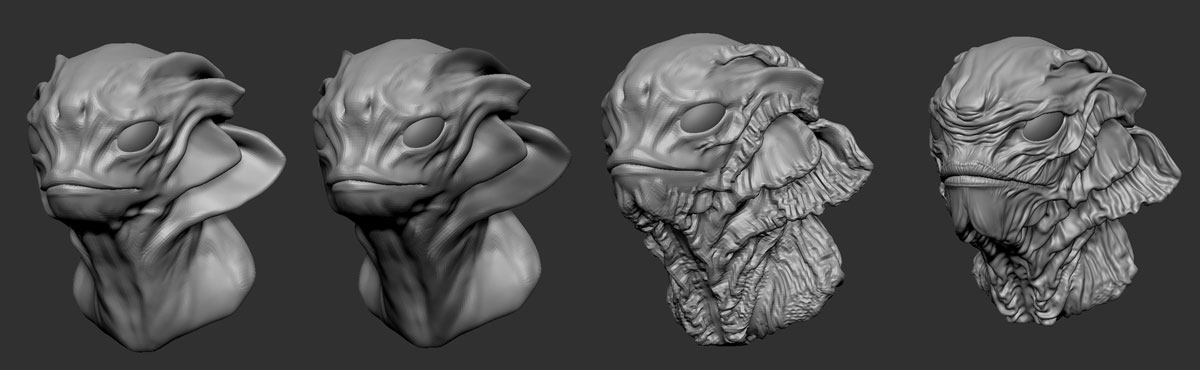
For the ‘Swamp creature’ below, I used dynamics and brushes with dynamics to sculpt (even at the Dynamesh stage). I also find a pretty interesting use of dynamics to create hair cards that conform to the meshes.
The original sketch was actually quite simple and boring, but I used masking brushes to select specific areas of the mesh where I wanted to produce compression and some excess of skin. From the Dynamics palette, you can enable the ‘On Masked’ and run the simulation in just those areas (or invert masking and run the default settings of the simulation).
To achieve the additional folds, I used a combination of Gravity and the Expand feature. The amount and size of the additional folds can be tweaked from the ‘firmness’ slider and with a nice balance of low gravity/expand and Simulation iterations values.
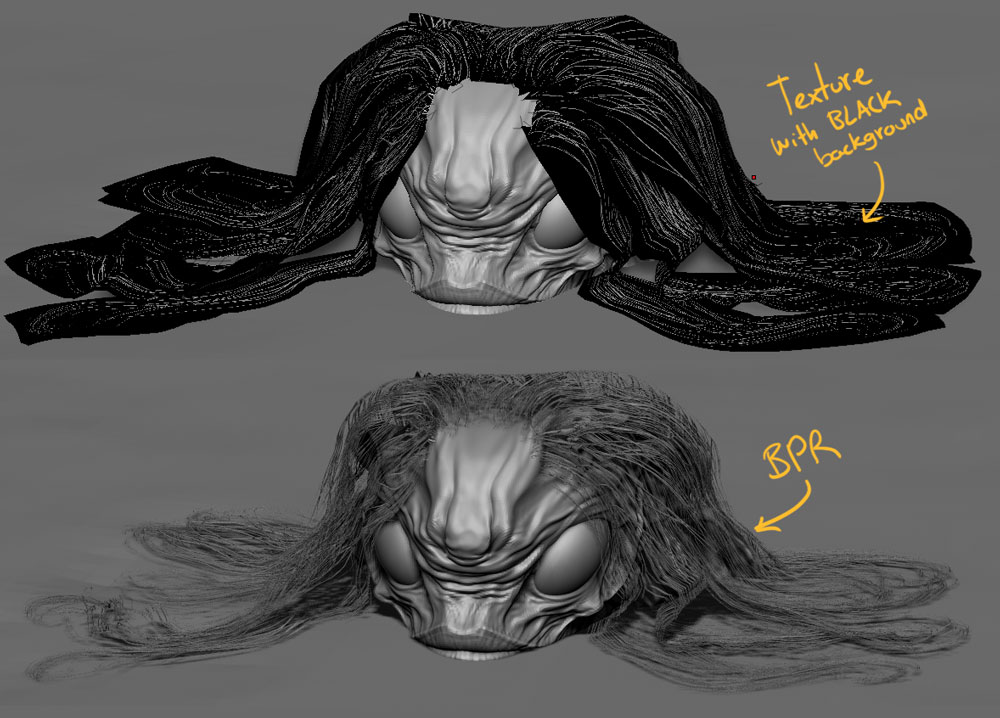
For the hair of the creature, I created a low-res single-sided plane with a playgroup at the ‘root’ for easy masking. I used the Gizmo 3D to simply place various copies of the same plane around the head, making sure that the short polygroup was close to the head.
Once I had all the meshes placed perpendicular to the head, I created some quick UVs, masked the ‘root’ to protect it and rand simulation with Gravity and ‘Self-collision’ enabled (all planes are in the same subtool).

After I ran the simulation, I did some very minor tweaks with the move topological to avoid intersections of the planes and applied a texture with a black background. From the Texture Palette, you can enable Transparency and complete the effect!
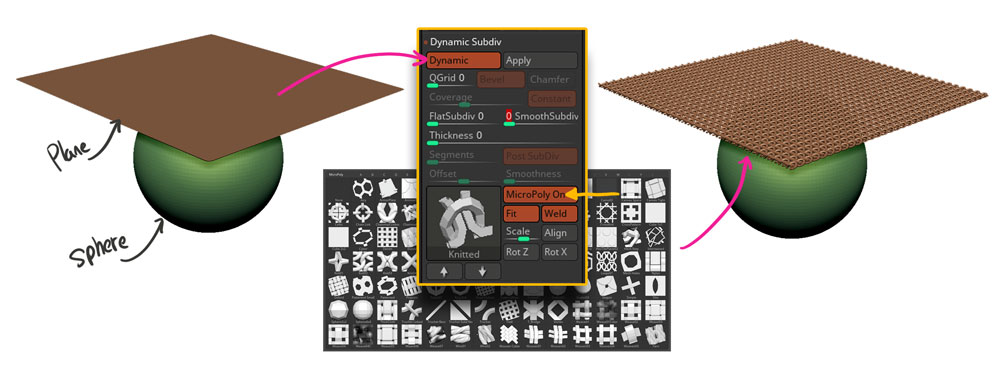
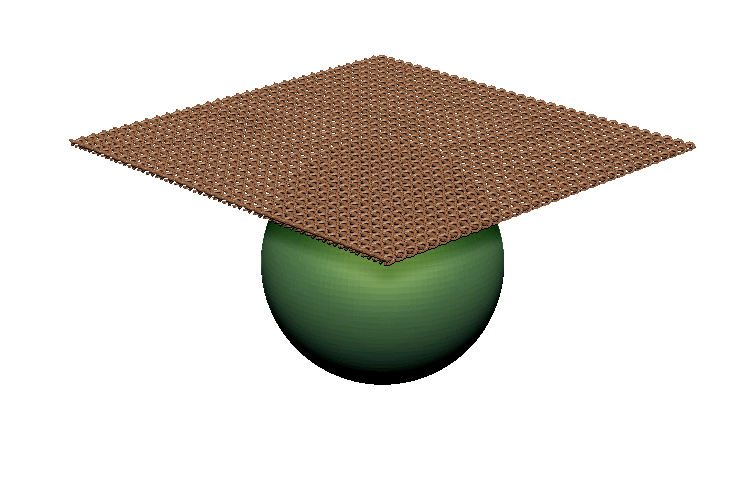
Another awesome feature from ZBrush 2021, is the ‘MicroPoly’ from the Dynamic Subdivision section. This tool allows you to apply real geometry to every single face of a mesh and use simulation with it on. all you need to do is set up a base mesh (ideally a low-res mesh with decent topology… it could be a quick ZRemesh), go to Dynamic Subdiv, enable Dynamic, and click on the ‘MicroPoly’ switch.
Once you enabled the MicroPoly switch, you can click on the thumbnail next to it and choose from a variety of micro-poly meshes that come with ZBrush 2021.
The size of the MicroPoly meshes will be determined by the size of the polygon faces on the mesh you are using as a base, but you can tweak the ‘smoothSubdiv’ slider to add more Dynamic subdivision and reduce the size of the MicroPoly meshes
And the really cool thing about this feature is that you can just run the simulation with the Micropoly on and see the base mesh deform and interact with other elements while the integrity of the MicroPoly mesh is maintained!
You can also create your own MicroPoly pieces. All you need to do is make sure the mesh you use is:
1. low-res (remember it will be applied to every face)
2. Should fit exactly the dimensions of a ZBrush unit square so that you get the ’tiling’ effect.
3. It should be a tileable mesh so the points at the border should connect
Once created, you can go to the MicroPoly section and hold ‘Ctrl’ and click the thumbnail to select the new Micropoly.

And get updates from the ZBrushGuides
& 3DConceptArtis in one place
On this site, you will find a variety of tutorials, articles, videos and eBooks all of which will show you exactly HOW I make the things I love doing… You’ll also find resources I created which you could utilise in your own projects.


